My first drop pictures

Hi.

I’ve mentioned it last time already. Beside of the macro and splish splash photography, I also try now the water drop photography.

As I mentioned last time already, it’s actually just possible with high-tech. At least if you want to create really stunning structures. But of course there are also some simple things for beginner. At least if the beginner isn’t fool or at least able to use Google ;)

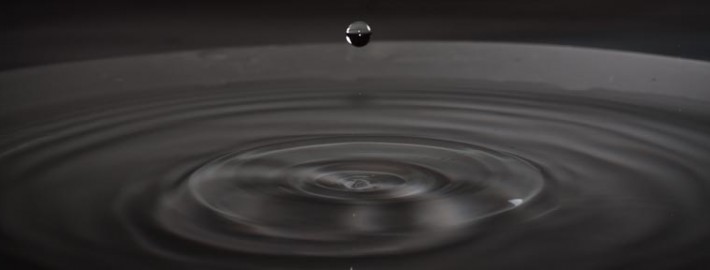
Drop pictures are – as the name is saying already – pictures of drops. :) Why to make pictures of drops? Well, because drops can create cool shapes, in the moment it hits something. Also here is the saying of many photographers – to freeze a moment – very true. Because this moment – when the drop is creating this amazing shapes – is just a flash. Not even clear visible for the human eye. (Have a look in the video below.)

Ok, how to do it now?
As I just said, it’s about a drop (water, milk, color… whatever). So, there has to be a drop. Professionals create the drops computerized and with magnet valves. But this can cost some xx-xxx Euros (except you are ambitious DIY’er).

But it is also cheaper possible. Beginner like the infusion sets. This things which they use in the hospital. Yes, this things which dropping. … Drop ;) It’s a very simple, but functional system. A small tube is connected to a bottle with liquid and the liquid is running trough the tube. But it needs to drop… that makes a regulator. So you can adjust the drop frequency.
It cost me today not even 1 Euro in the pharmacy.

But then the question… to what do I connect this infusion set? I didn’t had anything… so I just put the end in a pot of water. This on top of a chair – on a desk … keyword: gravity.
Then I fixed the other end a bit lower on the chair (half height). The drop still needs a height to fall. As higher as more powerful the impact. And the rest is easy.
Plate or flat bowl underneath (water level should be around 3 cm). The camera on a tripod. Focusing before the point where the drop will hit the water and then the focus on ‚manual‘, that the auto focus will not distort the focus point.

The most important part at drop photography is the flash. Because it’s the flash which will freeze the drop and it’s form. That’s why the flash needs to be set on the fastest burning time (my Yongnuo YN560 II can max. 1/128).
And then you need tact and playing around. The drop is falling and in the right moment you need to push the shutter.

It seems like the best place for the flash is behind the scene. On the other side of the plate (or whatever you use). But I have a space problem here… so I was playing around.
The internal flash I just need to remote control the slave flashes.
And my Godox CF-18 died at the session today :( Of course the seller is in Hong Kong… damn. But it seems like the Yongnuo is a work animal… the Metz died, the Godox died… the Yongnuo is still alive… and my last external flash at the moment :o

The good thing on slave flashes is, that they are not connected to the camera. They can be everywhere around. Which is here good because – as I said – the flash should be on the other side. So flashing from behind the scene.

But I anyway got some good results for the first try, as I think. You can see some of the results below.
I will play more in the next days with it. Will also try some colors and mild and such stuff. Will be funny :) and also a mess. But the pictures are cool, isn’t it? :) I think about to print some :)

Then see you soon.
Best regards
Gordon

Here the video of the setting:

And the pictures
[nggallery id=27]

Meine ersten Tropfen-Fotos | Tropfenfotografie

Hallo.

Beim letzten mal habe ich es ja schon angesprochen. Neben der Makrofotografie und dem Plitsch-Platsch, habe ich mich heute mit der Tropfenfotografie beschäftigt.

Wie beim letzten mal schon gesagt, ist das eigentlich nur mit Hightech zu bewerkstelligen. Zumindest wenn man wirklich gute Fotos haben möchte. Aber als Einsteiger hat man natürlich ein paar Möglichkeiten einfache Tropfenfotos zu kreieren. Man darf nur nicht ganz auf den Kopf gefallen sein ;) Oder zumindest sollte man Google bedienen können ;)

Tropfenfotos sind – wie es der Name schon sagt – Fotos von Tropfen. Warum man tropfen fotografieren sollte? Naja, weil ein Tropfen interessante Formen entwickeln kann, sobald er irgendwo auftrifft. Außerdem ist hier der Spruch vieler Fotografen – Den Moment festhalten – mehr gegeben als in jeder anderen Form der Fotografie. Den dieser Moment ist so verschwindend gering, das er kaum einen Augenblink andauert… und dann ist die Form auch schon wieder Vergangenheit. Mit dem Auge kaum wahrzunehmen. (Schaut dir einfach mal das Video unten an.)

Wie macht man es nun?
Wie gerade schon gesagt, es geht um einen Tropfen (Wasser, Milch, Farbe… was auch immer). Also muss man einen Tropfen erzeugen. Profis machen das Computergesteuert und mit Magnetventilen. Das kann aber mal eben einige xx-xxx Euro kosten (wenn man nicht gerade ambitionierter Bastler ist).

Es geht aber auch einfacher. Unter Anfängern sind die Infusionssets beliebt. Die Dinger aus dem Krankenhaus, wenn jemand am Tropf liegt. Jep.. tropf… da tropft was. Das ist ein einfaches, aber sehr funktionelles System. Man schließt einen Schlauch an einer Flüssigkeitsflasche an und die Flüssigkeit läuft durch den Schlauch. Damit es aber tropft und nicht läuft, ist ein Regulator eingebaut. Damit kann man wunderbar die Tropfgeschwindigkeit einstellen. Hat heute nicht mal 1 Euro in der Apotheke gekostet.
Dann kam die Frage… woran schließe ich das jetzt an? Da ich nix hatte, habe ich das eine Ende einfach in eine Schüssel voll Wasser gelegt. Das ganze auf einen Stuhl – auf meinem Schreibtisch – positioniert… Stichwort: Schwerkraft.
Das andere Ende habe ich auf halber Höhe am Stuhl befestigt. Ein bisschen Fallhöhe sollte der Tropfen ja schon haben. Und der Rest ist einfach. Teller oder flache Schüssel drunter (Wasserstand sollte um die 3cm sein, habe ich gelesen). Die Kamera auf ein Stativ. Den Punkt wo der Tropfen aufschlägt vorher Fokussieren und dann den Fokus auf manuell stellen, damit er nicht mehr verstellt wird.
Das wichtigste bei der Tropfenfotografie ist der Blitz. Denn der ‚friert‘ eigentlich den Tropfen ein. Daher den Blitz auf die geringste Brenndauer einstellen (mein Yongnuo YN560 II kann max. 1/128). Und dann heißt es Fingerspitzengefühl und ein bisschen rumprobieren. Der Tropfen fällt und im richtigen Moment muss man ‚Abdrücken‘.

Es scheint am besten zu sein wenn der Blitz hinter dem Teller (oder was auch immer) steht. Da ich hier aber ein Platzproblem habe, hab ich heute ein wenig rumprobiert. Den Kamerablitz brauche ich eigentlich nur um die beiden anderen Blitze fernzusteuern. Beide (der Godox  CF-18 und der Yongnuo YN560 II) unterstützen den Slave Modus. Dabei wird der Blitz selbst durch einen Blitz ausgelöst. Das heißt wenn der Kamerablitz blitzt, dann werden auch die anderen beiden Ausgelöst. Das nennt man ‚entfesseltes Blitzen‘ und ist eine tolle Sache, wie ich schon ausgetestet habe. Gerade für solche Spielereien. Dann sind die Blitze nicht mehr direkt an die Kamera gebunden und können frei Positioniert werden.

Wobei sich der Godox CF-18 heute auch gleich verabschiedet hat. Die Lampe leuchtet zwar noch, aber blitzt nicht mehr :( Tolle Sache. Erst der Metz 36 AF-5 und jetzt das Ding auch noch. Ok, der Godox war Billig und ist ein Spielzeug. Aber trotzdem, nach nicht einmal 2 Wochen. Natürlich sitzt der Verkäufer in Hong Kong. :( Na mal schauen.

Na jedenfalls hab ich dabei heute schon mal ein paar interessante Fotos hinbekommen. Unten in der Galerie könnt ihr ein paar davon sehen.
Ich werde in den nächsten Tagen noch mal ein bisschen damit rumspielen, sofern das mit einem Blitz geht. Sollte aber.
Vielleicht kommt ja noch was nettes bei raus. Will auch mal Farben und Milch ausprobieren (ein paar Milchfotos hab ich schon gemacht heute). Wird bestimmt lustig… und eine Sauerei :D Aber die Fotos sind schon klasse, oder? Ich bin schon am überlegen welche auszudrucken :)

Dann bis bald.
Viele Grüße
Gordon

Hier noch das Video vom Arbeitsplatz:

Und die Bilder:
[nggallery id=27]

Now I’ll make splish splash pictures

Hi,

after I was busy in the last days and weeks with macro photography, I found another interesting thing in a forum. Basically it’s about to drop things into water and shooting a picture (hopefully) in the right moment. :) Actually I came on this through another subject of photography… the drop photography. And this is about to make a picture of a water (or whatever) drop. The results… just ask Google for „water drop pictures“. Absolutely stunning!

But I don’t have an idea about it and really good results you’ll get only with microprocessor technique, so I have to do first something more easy.

Microprocessor controlling sounds complicated? It’s actually not… it’s just about precision. It have to be done in split of a second… about millisecond. A magnet valve drops a drop. The drop hits the water and creates the column. In this moment the technique triggers the camera and the flash. It has to be optimized on a millisecond.
And then you can go further… more magnet valves, which drop drops in exact intervals. This drops hit each other and create amazing structures and forms… which exist only for  a split of a second. That’s why it has to be controlled with technique.

So, I have to start with something more easy. :) And I call it now „splish splash“. (Don’t know if there is a name for it already.) Dropping things into water and make a picture of it. And here are the first results :)

[nggallery id=26]

Jetzt gibt es Pitsch-Patsch Bilder

Hallo zusammen,

nachdem ich nun einige Tage und Wochen mit der Makrofotografie beschäftigt habe, bin ich letztens im Forum auf eine andere interessante „Methode“ gestoßen. Im Grunde schmeißt man Dinge ins Wasser und fotografiert sie dabei im (hoffentlich) richtigen Moment :) Eigentlich bin ich auf die Sache durch eine andere Sache gekommen… der Tropfenfotografie. Dabei geht es darum einen Tropfen (im hoffentlich richtigen Moment) zu Fotografieren. Was dabei rauskommt… einfach mal Google nach „Tropfenfotografie“ fragen. Da kommen total geniale Bilder bei raus.

Da ich aber noch keine Ahnung davon habe und wirklich gute Ergebnisse nur mit Mikroprozessorgesteuerter Technik erzielt werden, muss ich mich erst einmal mit was anderem Beschäftigen.

Mikroprozessorgesteuerte Technik klingt kompliziert? Ist es eigentlich nicht… es geht nur um Präzision. Es geht dabei um Bruchteile von Sekunden… um Millisekunden. Ein Magnetventil lässt einen Tropfen fallen. Der Tropfen fällt ins Wasser und die Säule entsteht. In dem Moment wird die Kamera und oder Blitze automatisch ausgelöst. Das alles auf die Millisekunde optimiert.
Dann kann man weitergehen… mehrere Magnetventile, die in genauen Abständen jeweils einen Tropfen abwerfen. Diese Tropfen treffen sich dann und ergeben umwerfende Formen und Figuren… die auch nur für einen Bruchteil einer Sekunde existieren. Daher muss alles technisch gesteuert sein, da ein Mensch das so gar nicht koordinieren könnte.

Also muss ich erst einmal mit was einfacherem Anfangen :) Und das hab ich mal „Pitsch Patsch“ genannt. Dinge ins Wasser werfen und dabei Fotografieren. Und hier die Resultate :)

[nggallery id=26]

Visit at Lefkara

Hi together.

Today I was with a friend on picture tour. We went to the small mountain village Lefkara. It’s approx. 40 km from Limassol. With the car is it approx. 30 min to go.

The village is really special. Many people told me already about it… how nice it is, that artist live there and all the embroideries. Today it was time to go there.

Lefkara is located between Larnaca and Limassol. Almost exactly in the middle is a highway exit with McDonalds. This exit you have to take (but it is also signposted) and then in direction to the mountains. The second village is already Lefkara. You can’t miss it.

The village itself is separated in an upper and lower part. It’s around 500 meter above sea level and around 110 people live here.

It is famous for its embroidery and silversmiths. A legend says that even Leonardo da Vinci came 1481 to Lefkara to purchase lace cloth for the altar of the Duomo di Milano.

For sure is that this village is a special place on the island. I can’t really describe it, you need to see and feel it by yourself.

The village consists almost only of natural stone houses. The streets are very narrow (also for cars) and in many of them are flowerpots. The people are very friendly, which is maybe referable to the point that they want to sell their embroidery.

In some corners you can see some woman sitting together and they embroider together, on the street.

One alley was very interesting. It was approx. 1.20 meter wide. In the middle was a kind of bridge – which connect one house with the one opposite – above it. Under this bridge was a couch and a chair and even a painting was on the wall. I was afraid to walk through someones living room. But it was the alley. Really cool :)

After walking a while through this narrow alleys in this village, you realize one thing: Time carries no weight here.

Unfortunately are there also some abandoned houses (of Turkish Cypriots, which left them already before the war). They ruinous slowly but steady, which destroys the total picture a bit.

But anyway I would suggest a visit in the village Lefkara. It worth it for sure.

Also you can make beautiful pictures here ;)

I can’t say much more at the moment about Lefkara. Go there an have a look by yourself.

I will add some pictures below. Unfortunately I didn’t made much of the landscape and of the village itself, because I am at the moment more into macro photography :)

Best wishes

Gordon

Besuch in Lefkara

Hallo zusammen.

Heute war ich mit einer Freundin auf Foto-Tour. Es ging in das kleine Bergdorf Lefkara. Es ist ungefähr 40 Km von Limassol entfernt. Mit dem Auto in einer guten halben Stunde zu erreichen.

Das Dorf hat schon etwas besonderes. Viele Menschen haben mir im Laufe der Zeit immer wieder davon erzählt, wie schön es doch sei, das dort viele Künstler leben und die ganzen Stickereien. Heute war es dann soweit.

Lefkara liegt zwischen Larnaka und Limassol. So ziemlich genau in der Mitte kommt eine Autobahnabfahrt mit McDonalds. Die muss man runter (ist auch ausgeschildert) und dann Richtung Berge. Schon das 2. Dorf ist Lefkara. Nicht zu verfehlen.
Das Dorf selbst ist in einen unteren und oberen Teil unterteilt. Es befindet sich auf ca. 500 Meter über Null und es leben ca. 1100 Menschen dort.

Bekannt ist es, wie gesagt, durch seine Stickereien und Silberschmiede. Eine Legende sagt das sogar Leonardo da Vinci im Jahr 1481 und kaufte Spitzenstoff für den Hauptaltar des Duomo di Milano.
Definitiv ist das dieses Dorf ein ganz besonderer Platz auf der Insel ist, das steht fest. Kann man gar nicht so wirklich beschreiben, man muss es gesehen haben.

Das Dorf besteht fast ausschließlich aus alten Natursteinhäusern. Die Gassen sind schmal (auch für Autofahrer) und in vielen stehen Blumentöpfe mit Pflanzen. Die Menschen sind überaus freundlich, auch wenn es vielleicht darauf zurückzuführen ist das sie etwas verkaufen wollen. Man sieht an manchen Ecken einige Damen zusammen sitzen und mitten auf der Straße gemeinsam sticken.

Eine Gasse war besonders interessant. Sie war ca. 1,20 Meter breit. In der Mitte war eine Brücke – von einem Haus zum gegenüberliegenden – darüber. Unter dieser Brücke standen Sofa und Sessel und sogar ein Bild hing an der Wand. Man hatte Angst durch das Wohnzimmer eines Anwohners zu gehen. Aber es war eine Gasse. Total genial :)

Wenn man eine Weile durch die kleinen Gassen geschlendert ist dann realisiert man eine Sache: Zeit hat hier keine Bedeutung.

Leider gibt es auch hier viele verlassene Gebäude (von türkischen Zyprioten schon vor dem Krieg verlassen). Diese verfallen langsam aber sicher, was das Gesamtbild sehr trügt. Aber sonst ist das Dorf definitiv einen Besuch wert. Auch um schöne Bilder zu machen ;)

Viel mehr gibt es zu Lefkara schon gar nicht zu sagen. Hinfahren und ansehen.

Ich hänge unten noch ein paar Bilder an. Ich habe leider nicht viele von der Landschaft und dem Dorf an sich gemacht, da ich im Moment ja eher Makro fotografiere.

Viele Grüße
Gordon

Fly with a drop

A young fly decided to have a rest on my window board today. First I didn’t recognized her. Then I saw her and gave it a shot. I grabbed my camera and approached slowly. But the fly didn’t gave a sh** at all. She just sat there let me do what I wanted to do.

So I made many many pictures :) After a while she started to clean herself and after it she started to create a drop on her mouth. She enlarged the drop slowly and sucked it back in the mouth. And then started again to create it, enlarged it slowly and sucked it back in the mouth.

After the second time it seemed like she finished and flew away.

Nobody really knows what this drop is or what it has for a function for the fly. But it seems like many/all flies do it.

The most probable is that it is for cleaning of inner things (like mouth, maybe more). Especially because the one today did it after cleaning.

And here the picture for the story:

Fliege mit Tropfen

Heute hat sich eine kleine Fliege auf meiner Fensterbank niedergelassen. Ich bemerkte sie erst gar nicht. Dann entdeckte ich sie und ließ es auf einen Versuch ankommen. Also schnappte ich mir meine Kamera und näherte mich langsam. Doch die Fliege interessierte das gar nicht. Sie saß da und ließ mich in aller Seelenruhe machen.

So entstanden viele viele Bilder :) Nach einer Weile fing sie an sich zu Putzen und am Schluss ließ sie einen Tropfen am „Mund“ entstehen. Ganz langsam wurde er größer, dann saugte sie ihn wieder ein und ließ ihn wieder ‚entstehen‘ und saugte ihn wieder ein.
Nach dem 2 mal schien sie fertig zu sein und flog davon.

Niemand weiß wirklich was es mit diesem Tropfen auf sich hat. Aber alle Fliegen scheinen es zu tun.
Die wahrscheinlichste Theorie scheint zu sein das es zur Reinigung des Munds dient. Gerade da diese es heute nach dem Putzen getan hat.

Und hier das Foto zur Story:

My first real macro lens with the first real macro pictures

Hi,

it’s been a while ago already again since I was writing my last article. At the moment I do actually just 2 things: working and photographing… and mostly the first one :( But it also has some good part.

Like that I was able to extent the part of the photography which I like most, the macro photography. I love to „shoot“ the small things :)

After I tried the trick with the reverse lens, I was on fire. :)
I couldn’t resist to buy a real macro lens. It is the Olympus Zuiko 35mm 1:3.5. A nice baby :)

Of course I had to try it straight on the day when it arrived. And very fast I had to realize the pitfalls of this kind of photography. The light is quickly gone, it’s shaking like hell, the working distance is very short and using the flash at 1:1 is not possible anymore (the lens is in the way). And of course is all connected to each other. Without flash I need a longer shutter speed and without a short shutter no sharp pictures.

And so I had to continue my shopping tour right away. A rail system (for 2 flash, left and right of the camera), 3 different flash types and soft boxes. On top a bit to read about the subject. Everything is on the way now and I hope it will arrive until the next weekend. I am very impatient in this case :)

But I could make some ‚ok‘ pictures already. (Below the pictures)
And here is another disadvantage of the 35mm lens. The working distance at 1:1 (full enlargement) is just a few centimeter. That is a distance which 98% of all animal don’t tolerate anymore and run away… if they are able and fast enough to do it. Bugs, worms and something like that are tolerant or to slow. Spiders or flies are not so tolerant anymore and run. Not to talk about butterflies or dragonflies… I can’t even reach them to 2 meters :(

I will try it with patience and maybe saving some money for a macro lens with more focal distance.
But it is already very interesting what you can find if you sit half an hour on one place and just look around and wait.
Some animals are there already and you see then first later. Other come and don’t give even attention about you… as long as you don’t move to much.

Here another disadvantage of the macro photography. To make good shots it would be necessary to use a tripod. But I don’t like it, because for outdoor shootings is it in my opinion not useful and even disturbing.
Until it is set up and the camera in position … is the motive already gone (except of a snail maybe, but even this one would be already out of the focus range).

By the way. Do give you a small hint (from my experience now). In the macro photography is the area which is sharp very small. From 1mm till maybe 1cm. Whereby the aperture must be very small for 1cm… which means an extreme lack of light.
I try whenever it is possible to shoot with 1:1. Means with the most possible enlargement of the lens. With it I can copy with my Olympus E-410 an area of 17,3mm x 13mm.

So if you see a spider in the gallery full size on a picture, then is it actually probably just a few millimeter big ;) And that is what fascinates me at it. Details ;)

So, enough of the word… let’s pictures speak.
(The gallery is always up to date. Even when I upload later new pictures.)

Many regards
Gordon

[nggallery id=25]

Mein erstes echtes Makroobjektiv mit den ersten Makro Fotos

Hallo zusammen,

es ist nun mal wieder schon eine Weile her seid ich das letzte mal was geschrieben habe. Aktuell gibt es eigentlich nur 2 Sachen die ich mache: Arbeiten und Fotografieren… wobei ersteres stark Überwiegt :( Aber hat ja auch was Gutes.

So konnte ich nun endlich mal den Bereich der Fotografie ausbauen den ich besonders mag, die Makrofotografie. Ich liebe es kleine Dinge groß abzulichten :)

Nachdem ich letztens spontan mal den Trick mit dem Objektiv umdrehen probiert hatte, war ich Feuer und Flamme :)
Da konnte ich nicht mehr wiederstehen mir ein richtiges Makroobjektiv zu kaufen. Es ist das Olympus Zuiko 35mm 1:3,5 geworden. Ein schönes Schätzchen :)

Natürlich wurde es noch am Tag der Ankunft ausprobiert. Und schnell durfte ich auch die Tücken dieser Art der Fotografie feststellen. Es geht einem schnell das Licht aus, es wackelt wie Hanne, der Arbeitsabstand ist extrem gering und Blitzen bei 1:1 mit dem eingebauten Blitz geht auch nicht mehr (Das Objektiv schattet das Motiv ab). Und natürlich hängt alles zusammen. Ohne Blitz keine kürzere Belichtungszeit und ohne kurze Belichtungszeit keine scharfen Motive.

Und so durfte ich meine Shoppingtour gleich fortsetzen und habe mich gleich noch mit einem Schienensystem (für 2 Blitze, links und recht von der Kamera), 3 verschiedenen Blitzen und Softboxen eingedeckt. Dazu auch noch ein bisschen was zum Lesen zum Thema. Das Ganze ist gerade unterwegs und ist hoffentlich bis zum nächsten Wochenende da. Bei sowas bin ich ja sehr ungeduldig :)

Aber ein paar passable Fotos konnte ich schon machen. (Unten die Bilder)
Nur hier gibt es noch einen Nachteil des 35mm Objektivs. Der Arbeitsabstand bei 1:1 (volle Vergrößerung) beträgt nur wenige Zentimeter. Das ist eine nähe die 98% aller Tiere nicht mehr Tolerieren und sich verdrücken… also wenn Sie dazu in der Lage sind. Käfer, Würmer und ähnliches sind da recht tolerant bzw. zu langsam um vor mir zu fliehen. Spinnen, Fliegen und sowas sind da schon nicht mehr so und suchen schnell das Weite. Von Schmetterlingen, Libellen und ähnlichem gar nicht erst zu reden. Da komme ich nicht mal auf 2 Meter ran. :(

Ich werde es mit Geduld versuchen und zur not auf ein Makroobjektiv mit mehr Brennweite sparen.
Es ist aber auch schon so sehr interessant was man alles findet wenn man sich mal eine halbe Stunde an ein und den selben Platz setzt und sich einfach nur umschaut und wartet. Manche Tiere sind schon da und man sieht sie erst viel später. Andere kommen und beachten einen gar nicht mehr… solange man sich nicht großartig bewegt.

Hier noch ein Manko der Makrofotografie. Um gute Bilder zu machen sollte man eigentlich ein Stativ verwenden. Dagegen wehre ich mich aber, da es für Außenaufnahmen in meinen Augen absolut störend ist. Eh man es aufgebaut hat und mit Kamera in Position gebracht hat… ist das Motiv längst über alle Berge (außer eine Schnecke vielleicht… aber selbst die ist bis dahin aus dem Fokusbereich).

Apropos. Um Dir mal einen kleinen Einblick (aus meinen jetzigen Erfahrungen) zu geben. Bei der Makrofotografie ist der Bereich der Scharf ist extrem klein. Von ca. 1mm bis vielleicht 1cm. Wobei bei 1cm die Blende verdammt klein sein muss und das heißt extremer Lichtverlust.
Ich versuche immer wenn möglich 1:1 zu Fotografieren. Also mit der größtmöglichen Vergrößerung des Objektivs. Damit kann ich mit meiner Olympus E-410 einen Bereich von 17,3 x 13 mm Ablichten.

Wenn Du also unten in der Galerie eine Spinne auf voller Bildgröße siehst, dann ist sie wahrscheinlich in echt nur wenige Millimeter groß. ;) Und genau das Fasziniert mich daran. Details. ;)

So, genug der Worte… lassen wir mal Bilder sprechen.
(Die Galerie aktualisiert sich von allein, immer wenn ich neue Bilder hoch lade. Ist also immer aktuell.)

Viele Grüße
Gordon

[nggallery id=25]