Photographing soap bubbles
Hi,
yesterday I found a new photo idea and needed to try it straight away. ;) Of course I want to show you the results and tell you how I done that. :)
After I was playing around now with water drops, things which fall into water (splish-splash) and macro, it was time today for soap bubbles.
Yes, right. This bubbles which children like to let them fly in the air. ;)
 Actually I had straight 2 ideas. If you let a soap bubble fly outside in the sunshine, then you was probably amazed about the colorful round bubbles.
Why this bubbles are so colorful… is complicated :D But I wanted to catch this colors.
On the other side is it creating really amazing pictures when the bubble burst.
And when you read this both points, then it should be quick clear that the 2nd point should be much harder to achieve then the 1st. Because the bubble is bursting so quick that it is not possible to catch for the human eye. But the practice is a bit different.
So, first step. Trying to catch the colors of the bubble.
I was reading a bit in the internet about it and they said the light is the most important. No, problem, i have 2 flashes with slave mode (so, I can remote control them). Then – of course – you need soap water. It’s not hard to make. Just add a bit water to a glass, plus a bit soap. For the fist step I’ve added as well a bit glycerin, that the bubbles are more stable and I’ll have more time to shoot them.
The setup was very simple. The glas on my desk, a flash from the top, the other one from the side, my desk lamp on the position of the bubble (that I see something while focusing). In front of the desk my E-620 with the 35mm macro lens.

Das Feuer in der Blase
And then I’ve started. Blowing a bubble on the straw and putting the straw with the bubble on the glass, that I can focus it.
And then trying to focus manually. Because the automatic focus doesn’t work with the look trough bubble. But also manual is it not really easy to see and focus on one ‚wall‘ of the bubble.
And then pushing the shutter… and quick it was clear… it doesn’t work like that.
The bubble was still ‚invisible‘ and only the pieces of it, which the Softbox lighted up was colorful.
And then the improvisation started. I don’t have a bigger softbox. So I was building up paper wall through which I tried to flash, to get a bigger light-wall. But due to the ball shape of the bubble I would have needed a light-wall from the top, left, right, bottom and front… :( Damn.
So, I just got results with partly colorful bubbles.
I think a good solution would be to try it again outside, in the sun. But then there shouldn’t be any wind at all.
But a few interesting shots I could take.

Das Meisterstück des Versuchs
Ok, then it was time for the second part of the shooting. The bursting soap bubble.
The setting was the same. Flash from the left, flash from the top and the camera on a tripod in front of the desk. The focus was this time fix on the collusion object.
Soap bubbles are very unstable objects… that is at least what I know about it. So, my thought was that I just need something on which I can hit the soap bubble and it should burst. Should work…
I fixed a toothpick on the desk and made a bubble and… ‚hit’… the toothpick was in the bubble… but no sign of bursting. … Great…
 Then I remembered the Glycerin in the water. So, I needed a new mixture. Just water with a bit of soap. And the next try… the same result. But the bubbles was much more unstable already. So, I just needed a bigger collusion object. An old candy seemed a good idea (which even looks good on the picture :D ).
But even the candy doesn’t gave me the result I expected. The soap bubble was attaching now to the candy and left the straw. … Looked also nice, but not what I wanted.
And then I found the trick. I had to blow up the bubble until the surface turned red-green. Seems like then the wall is so thin that it burst easily. (I think the colors vary by the mixture.)
So, when I had the bubble in this condition, then it was bursting as soon as it was hitting the object.

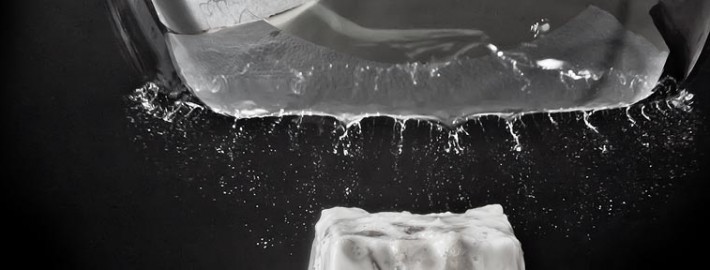
Seifenblase platzt von oben nach unten
And now it was just a question of timing. And this is also hard (if you do it manually). The bubble is bursting in millisecond, to fast for the human eye.
In one moment it’s there and in the next it’s gone.
So, I had a lot of pictures with bubble and a lot without bubble… and some I catch in the right moment. :)
 So it is like always… not easy, but the results are great. Especially the bursting bubbles are amazing. Didn’t thought they will turn out so nice.
And with better equipment it could be even better.
By the way, maybe a few words to that.
It is very important to use flashes with a short burning time. Because the flash is freezing the moment, not the camera.
I used the setting 1/128 with my Yongnuo YN560II. That is the lowest power I can set up. But it seems like ok. As faster as better.
So, I hope you liked the article and if you have questions… just leave me a comment. Of course you can also leave a comment without question ;)
CU
Gordon


Letzte Kommentare